
Upcycled Milk-Carton Paddle Boat: Hydrodynamics & Rubber-Band Propulsion
Harness Elastic Potential Energy and Archimedes’ Principle with a Recycled Twin-Blade Watercraft
- Test the boat ONLY in controlled shallow water environments such as a kitchen sink, washbasin, or bathtub under direct adult supervision.
- This toy is an educational demonstration model and must NEVER be used or considered as a lifesaving flotation device.
- Initial cutting of tough carton corners should be assisted by an adult using a utility blade or heavy shears.
Everything You Need to Build This Toy
- 1 clean, dry waxed milk or juice carton (poly-coated paperboard)
- 2 plastic container lids (polypropylene #5 or HDPE #2) for paddle fins
- 2 wooden skewers or chopsticks (from takeout meals)
- 2 to 3 heavy-duty rubber bands (size #64)
- Waterproof electrical tape or colored duct tape
- Permanent markers for waterproof hull artwork
- Sturdy kitchen scissors or craft shears
- Ruler or measuring tape
- Ballpoint pen or pencil
- Adult utility knife (for initial puncture cuts)
Assembly Instructions (5 Steps)
Follow each step carefully. Work together to clean waste, score precise cuts, align pivots, and test kinetic mechanics.
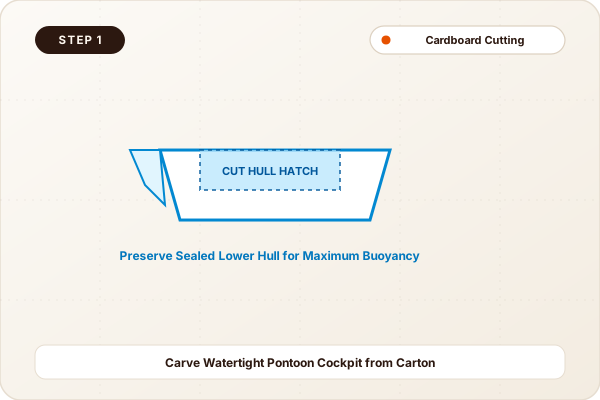
Carve Watertight Pontoon Cockpit from Carton
Lay the clean, dry milk carton horizontally on its side with the gable spout facing forward as the bow. Measure 3 cm in from all side edges on the top surface, and cut out a large rectangular hatch to create an open cabin cockpit while keeping the bottom and side walls completely watertight.
Draws guide lines on the top side of the carton and assists in cutting the open cockpit opening.
Preserving the sealed bottom and sidewalls ensures a large volume of air remains trapped to provide buoyant lift.
A sturdy boat hull with a pointed bow cabin and an open rectangular cockpit basin.
Cutting too deep into the corners, piercing the waterproof bottom fold and causing water leaks.
Anchor Dual Skewer Outrigger Axle Mounts
Position two wooden skewers along the rear sides of the hull so they extend 8 to 10 cm straight out behind the stern (rear) of the boat. Tape them securely into place using waterproof duct tape, wrapping around the carton body to prevent wobble.
Holds the skewers in parallel alignment while wrapping tight waterproof tape bands around the carton.
The outriggers act as the drive axle suspension. If they flex inward under rubber band tension, the paddle will jam.
Two rigid wooden arms extending back from the stern like twin catamaran rudders.
Using paper masking tape, which dissolves and loosens as soon as it gets wet.

Fabricate Interlocking Twin-Paddle Rotor
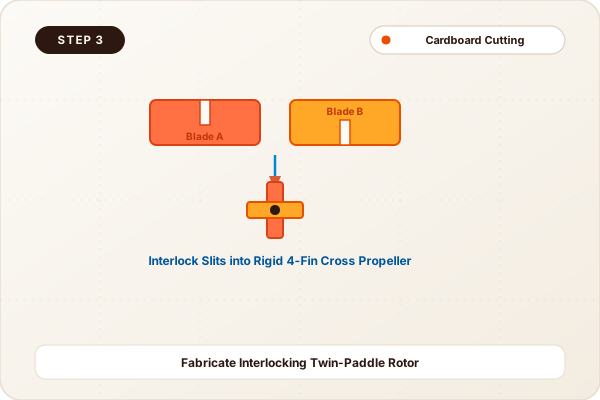
Cut two identical rectangles (approx. 7 cm wide by 4 cm tall) from stiff plastic tub lids. Cut a centered slit halfway through each blade (one slit from the top edge down, one slit from the bottom edge up). Slide the two slits together to create a rigid 4-blade cross (+ shape).
Measures and cuts the plastic rectangles, tests the interlocking center slits, and checks the 90-degree cross angle.
A 4-blade rotor strikes the water continuously, delivering smooth, uninterrupted thrust compared to a flat single blade.
A symmetrical, rigid plastic cross with four equal paddle fins radiating outward from the center axis.
Cutting the slits more than halfway, which makes the center hinge floppy and weak.
Mount Paddle into Tensioned Rubber Band Axle
Loop a heavy-duty rubber band across the two protruding skewer outriggers. Separate the two parallel strands of the rubber band and slide the interlocking plastic paddle right between them so the elastic band grips the center hub tightly.
Stretches the elastic band over the skewer outriggers and centers the plastic paddle between the strands.
Frictional grip between the rubber band and plastic hub transmits stored torsional energy directly into rotational paddle torque.
The paddle wheel spins freely in mid-air between the outriggers without striking either skewer arm.
Making the paddle blades wider than the gap between skewers, causing them to collide and stop.

Wind Rotor Backward, Release & Launch in Basin
Rotate the paddle wheel backward toward the stern 15 to 20 full revolutions to twist the rubber band tightly. Hold the paddle with one finger, gently place the boat into a shallow tub of water, release the rotor, and watch it cruise across the water!
Winds the paddle wheel backward, holds the tension, places the hull gently on the water, and lets go.
Witnessing stored elastic potential convert into kinetic thrust in real time connects physics theory with tangible play.
The boat charges forward leaving a foaming water wake behind its spinning paddles.
Over-winding the rubber band until it snaps or binds up against the outrigger skewers.

Hydrodynamics, Archimedes’ Principle & Elastic Torque
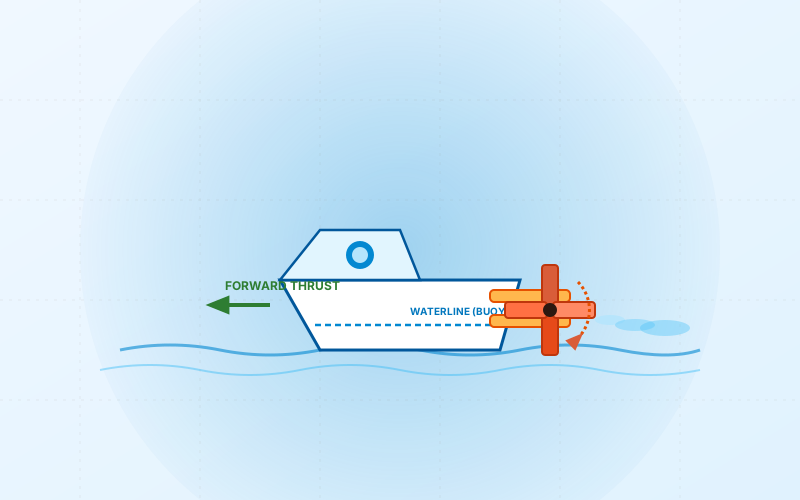
Two core scientific principles power this boat. First, Archimedes’ Principle dictates that an object immersed in a fluid experiences an upward buoyant force equal to the weight of fluid it displaces. The hollow waxed milk carton encloses a large volume of air with very little mass, giving the vessel a low average density that floats high on the waterline. Second, propulsion relies on energy conversion and Newton’s Third Law of Motion. Winding the paddle backward twists the rubber band, storing elastic potential energy as mechanical torsion. When released in water, the rubber band unwinds rapidly, driving the plastic blades through the water. Each blade pushes water backward; in response, the water exerts an equal and opposite forward reaction force (thrust) that accelerates the boat.
Elastic potential energy stored in twisted rubber bands converts to kinetic rotary motion, pushing water backward to propel the buoyant vessel forward.
Skills Your Child Develops with This Project
Fluid Dynamics & Hydrostatic Intuition
Observing how hull shape, draft depth, and weight distribution impact vessel stability and water resistance.
Mechanical Assembly & Symmetry
Constructing perpendicular outriggers and interlocking rotor blades that balance evenly on a central axle.
Experimental Iteration & Tuning
Calibrating band tension, blade immersion depth, and wind counts to optimize nautical speed and distance.
Fun Family Experiments & Mini-Games
The Great Bathtub Regatta
Time how many seconds it takes your paddle boat to cross the length of the bathtub. Tweak your wind count to achieve the fastest record.
Cargo Freighter Challenge
Place 5 coins or plastic toy figures inside the open cockpit. Can your boat still float above its waterline and make a successful voyage?
Change One Variable & Observe What Happens
True scientists don’t just follow instructions—they test hypotheses! Try these guided experiments to see how altering physical variables changes your toy’s behavior.
Paddle Blade Surface Area Trial
Build two different paddle rotors: one with narrow blades (2 cm wide) and one with wide blades (4 cm wide). Which rotor moves the boat farther on 15 winds?
Surface area of paddle blades / Fluid resistance
Expected Observation:Wide blades generate greater thrust and accelerate faster, but unwind the rubber band quicker due to increased water resistance.
Winding Count & Distance Curve
Test the travel distance with 5 winds, 15 winds, and 25 winds. Does doubling the winds double the travel distance?
Number of rotor pre-winds / Torsional potential energy
Expected Observation:Distance increases with winds up to a point, after which excessive torque causes the paddles to cavitate (churn air and foam) rather than biting solid water.
Ballast Center of Gravity Test
Slide a lump of modeling clay or coins all the way forward into the bow cabin, then all the way back to the stern. How does pitch angle affect cruising speed?
Center of gravity and vessel trim angle
Expected Observation:When the stern is too heavy, the paddle submerges too deep and stalls; when the bow is too heavy, the nose plows into the water. Level trim is fastest.
3 Discussion Questions for Parents & Teachers
Why does the waxed cardboard float on top of water instead of immediately soaking through and sinking like regular paper?
If you wind the paddle wheel forward instead of backward, which direction will the boat travel, and why?
What happens to the water behind the boat when the paddle blades slap against it?
Troubleshooting & Quick Fixes
The paddle blades are wider than the space between the skewers, or the skewers are crooked.
Trim 5 mm off the outer tips of the plastic blades using scissors, or spread the skewer arms slightly wider.
Smooth bamboo skewers lack grip, allowing the rubber band loops to slide off.
Wrap a band of electrical tape around the skewer tips to form raised stopper collars.
Asymmetrical weight distribution or one skewer sitting lower in the water than the other.
Align skewers so both sit level with the water plane, and add a coin counterweight inside the higher side.
Make It Your Own: Safe Design & Decorative Ideas
Why Reusing This Waste Matters
Waxed and poly-coated beverage cartons are composed of virgin paperboard laminated with thin polyethylene plastic. Because the layers are heat-bonded, many municipal facilities cannot separate them, meaning millions of cartons go directly to landfills.
Upcycling cartons into aquatic science projects showcases the durability and water-resistance of these hybrid materials while reducing household packaging waste.
Parent Note:
A quintessential STEM boat experiment that brings physics to life during bath time or outdoor sensory water play, teaching Newton’s laws and naval engineering.
milk carton paddle boat
/toys/trash-eco-toys/milk-carton-paddle-boat
Intermediate • 6-10 Years
45 Minutes
Build an upcycled milk-carton paddle boat powered by rubber bands! Explore buoyancy, displacement, and Newton’s third law with this hands-on STEM guide.
AI Photography & Diagram Prompts (Hero, Materials, Step-by-Step)▼
Dynamic eye-level craft photograph of an upcycled milk-carton paddle boat floating on clear blue water in a white basin. The white and blue decorated carton has wooden outriggers and a spinning cross-paddle made from orange plastic lids, creating a splashy water wake. Bright natural daylight, sharp focus, no text.
Knolling flat-lay photograph of clean materials: one clean 1-quart waxed milk carton, two colorful plastic yogurt lids, two bamboo skewers, thick rubber bands, waterproof tape, and safety scissors neatly arranged on a sea-blue craft mat.
Detailed DIY instructional shot showing hands slotting two notched rectangular plastic paddle blades together into a four-blade cross rotor, with measurements and outrigger skewers visible in the background.
More Upcycled Projects in Cardboard & Box Engineering & Beyond
How to Build a Mechanical Cardboard Automata
Learn mechanical engineering by building an oscillating kinetic sculpture from corrugated cardboard, barbecue skewers, and offset cams.
DIY Multi-Tier Cardboard Marble Run & Gravity Spiral
Engineer a multi-tier gravity run using toilet paper rolls, shipping boxes, and paper cup funnels to explore friction, slopes, and momentum.
How to Build an Upcycled Cardboard Pinball Machine
Construct a desktop arcade pinball game using a cereal or shoe box lid, rubber-band spring flippers, popsicle stick bumpers, and marble deflectors.