
Newspaper Geodesic Building Dome: Structural Triangles & Load Distribution
Transform Waste Newsprint into High-Strength Architectural Struts to Build an Immersive Walk-In Play Fort
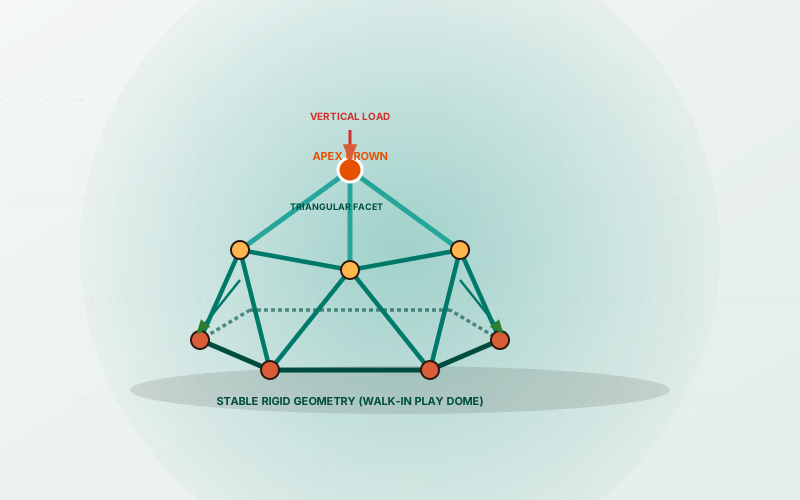
- This newspaper dome is an architectural canopy and reading fort: NEVER allow children to climb on, hang from, or sit atop the paper structure.
- Use only battery-powered fairy lights; never use incandescent bulbs, candles, or heat-generating lamps inside the paper fort.
- Supervise cutting and taping during large-scale construction.
Everything You Need to Build This Toy
- 35 to 65 broadsheet newspaper pages or large catalog newsprint
- Scrap cardboard from delivery boxes (cut into corner gusset discs)
- 2 to 3 rolls of masking tape or painter’s tape (duct tape for base nodes)
- 1 round pencil or thin wooden dowel (rolling core jig)
- Metal paper clips or brass brads (temporary node fasteners)
- Measuring tape or yardstick
- Sturdy kitchen scissors
- Permanent marker or pencil
Assembly Instructions (5 Steps)
Follow each step carefully. Work together to clean waste, score precise cuts, align pivots, and test kinetic mechanics.
Roll Ultra-Dense Newspaper Strut Tubes
Lay two overlapping sheets of newspaper flat on the floor. Place a thin pencil or dowel at one corner, and roll the paper diagonally as tightly as possible around the core. Continue rolling into a long, stiff rod, and tape the final corner flap securely with masking tape before sliding the pencil out.
Places the pencil diagonally at the corner and rolls the paper into a tight, dense tube, taping the end closed.
Tight concentric paper layers create high structural density, maximizing resistance to compressive buckling.
A rigid, pencil-thick paper dowel approx. 70 cm long that does not sag when held horizontally.
Rolling straight along the edge instead of diagonally; diagonal rolling creates more overlapping spiral layers for maximum stiffness.

Tape Edges, Trim to Size & Flatten Strut Tips
Roll 35 identical tubes (or 65 for a large full sphere). Using a measuring tape, measure each tube to exactly 60 cm long and trim the loose ends with scissors. Use your fingers to pinch and flatten the last 3 cm of both ends of each tube to create flexible connection tabs.
Measures each strut with a yardstick, trims the ends with scissors, and flattens the tips with their fingers.
Standardized strut lengths ensure equal equilateral triangle geometry, while flattened ends allow multiple struts to overlap cleanly at joint hubs.
A neat bundle of 35 identical paper structural struts with flattened connection tabs.
Trimming struts without measuring, creating mismatched lengths that prevent triangles from closing.

Assemble Rigid Pentagonal Ground Base
Take 5 struts and lay them in a circle on the floor with their flattened tabs overlapping to form a 5-sided base pentagon. Overlap the flattened ends and tape each corner joint firmly with multiple crisscrossing layers of heavy tape (or clamp with cardboard gusset plates).
Arranges 5 struts into a pentagon and wraps the overlapping corners with heavy tape bands.
The base foundation anchors the outward thrust of the dome. If the base joints slip apart, the dome will flatten.
A large, stable 5-sided pentagon lying flat on the floor with reinforced corner nodes.
Using weak tape that stretches under tension, allowing the base ring to expand and sag.

Erect Interlocking Triangular Wall Trusses
At each of the 5 base corners, attach two rising struts to form a standing triangle. Connect the peaks of adjacent triangles with horizontal struts to complete the lower tier wall ring. All wall faces will now form an interlocking zigzag pattern of triangles.
Holds rising struts upward in triangular pairs while a partner wraps the apex node with tape.
Triangulation converts vertical gravity into distributed compression along all members, making the walls self-supporting.
A waist-high circular wall composed of interlocking triangles standing firmly without any interior support posts.
Attempting to build alone without holding struts steady; teamwork makes node assembly fast and precise.

Cap the Central Apex & Load-Test Dome
Attach the final 5 roof struts from each upper node inward and upward to meet at a single central apex crown hub. Wrap the crown tightly with tape to lock all struts into a unified geodesic canopy. Test structural stability by draping a light bedsheet over the top to create a secret fort!
Brings the roof struts together at the center ceiling, wraps the apex crown, and drapes a sheet over the fort.
The crown completion turns the structure into a closed geometric shell where every strut supports every other strut.
A spectacular, walk-in geodesic dome fort standing proudly on the living room floor, strong enough to hold blankets and fairy lights.
Draping heavy wet blankets or leaning body weight against the struts, which exceeds the paper’s buckling limit.

Structural Triangulation, Compression Vectors & Buckminster Fuller’s Geodesics
Why does flimsy newsprint become strong enough to hold up an entire walk-in dome? The secret lies in material geometry and structural triangulation. First, tightly rolling flat newsprint creates a dense, multi-layered hollow cylinder. In physics, cylindrical tubes have high resistance to bending and buckling forces (moment of inertia), turning flexible paper into rigid structural struts capable of withstanding heavy compressive loads along their longitudinal axis. Second, the geodesic dome—popularized by architect Buckminster Fuller—is built entirely from interconnected triangles. Unlike squares or rectangles which can easily deform into parallelograms when pushed (shear failure), a triangle is geometrically rigid: its angles cannot change unless the length of one of its sides physically breaks or stretches. When downward force or weight is applied to the crown of the dome, the load is distributed equally along all connected triangular struts and dispersed outward around the circular foundation perimeter into the floor.
Rolling paper into tight tubular cylinders resists compressive buckling, while triangular lattice geometry distributes downward forces omnidirectionally down to the base ring.
Skills Your Child Develops with This Project
Architectural Engineering & Spatial Geometry
Translating 2D flat triangles into a complex 3D curved polyhedral dome and visualizing interconnected force paths.
Cooperative Teamwork & Project Management
Working together in assembly-line roles (rolling, taping, trimming, assembling) to accomplish large-scale construction.
Iterative Structural Reinforcement
Diagnosing flex points, reinforcing high-stress vertex hubs with gusset plates, and testing load capacities.
Fun Family Experiments & Mini-Games
The Reading Fort Transformation
Drape a lightweight twin bedsheet over the dome, leave an open triangular door flap, toss in floor pillows, and read a favorite storybook inside.
The Wind Resistance Hurricane Test
Set a household fan 2 meters from the dome on high speed. Does the aerodynamic curved dome deflect the airflow without toppling?
Change One Variable & Observe What Happens
True scientists don’t just follow instructions—they test hypotheses! Try these guided experiments to see how altering physical variables changes your toy’s behavior.
Square vs. Triangle Rigidity Showdown
Build one flat square frame from 4 struts, and one flat triangle frame from 3 struts. Push on one corner of each. What happens to the shape?
Geometric polygon shape (quadrilateral vs. triangle)
Expected Observation:The square immediately squishes into a flat diamond under gentle finger pressure; the triangle remains completely rigid and unyielding.
Strut Rolling Density Buckling Test
Make two test struts: one rolled loosely (approx. 3 cm wide) and one rolled ultra-tight around a pencil (1 cm wide). Stand both upright and press down with a heavy book. Which buckles first?
Wall density / Cross-sectional moment of inertia
Expected Observation:The loosely rolled tube buckles and crumbles under light pressure, while the tightly rolled dense tube easily supports the heavy book.
Canopy Load Capacity Experiment
Place a lightweight silk scarf over the dome, then a cotton sheet, and finally a light wool blanket. Measure if the dome height drops (deflects) under increasing load.
Dead load weight applied across dome nodes
Expected Observation:The geodesic dome distributes weight evenly across all ground nodes with minimal deflection, but excessive weight will cause the upper struts to flex.
3 Discussion Questions for Parents & Teachers
Why does a square frame easily distort when you push it, while a triangle stays completely stiff?
How can flimsy newspapers that tear easily with two fingers become strong enough to hold up a giant fort?
Where have you seen triangles used in real life to support bridges, cranes, or sports stadium roofs?
Troubleshooting & Quick Fixes
The newspaper was rolled too loosely, resulting in hollow, weak tubes.
Re-roll tubes as tightly as possible around a pencil core; dense tight layers dramatically increase compressive strength.
The corner tape joints on the ground ring stretched or separated under outward tension.
Reinforce all 5 base joints with cross-wrapped duct tape or sandwich each corner between two scrap cardboard discs.
Struts were cut to uneven lengths, throwing off the symmetrical geometry.
Measure and re-trim all struts to identical lengths before building the second tier.
Make It Your Own: Safe Design & Decorative Ideas
Why Reusing This Waste Matters
Even in the digital era, millions of tons of newspapers and advertising circulars are produced weekly and discarded after a single 10-minute read.
By rolling newsprint into structural architectural struts, families demonstrate the power of material science and circular upcycling, creating an immersive playhouse without purchasing expensive plastic toys.
Parent Note:
An extraordinary family or classroom project that introduces architectural engineering, geometry, and team collaboration on a grand, walk-in scale.
newspaper geodesic dome
/toys/trash-eco-toys/newspaper-geodesic-dome
Intermediate • 7-14 Years
60 Minutes
Build a giant geodesic dome fort from rolled newspapers! Explore structural triangles, compression forces, and Buckminster Fuller’s geometry with ToyToBook.
AI Photography & Diagram Prompts (Hero, Materials, Step-by-Step)▼
Inspiring wide-angle photograph of an impressive geometric geodesic dome fort constructed entirely from tightly rolled newspaper struts standing on a wooden living room floor. A soft cotton bedsheet covers half of the triangular framework, and warm fairy lights glow inside, where cozy pillows are arranged. Child-friendly, aspirational, realistic homemade craft.
Knolling flat-lay arrangement of materials: a neat stack of old broadsheet newspapers, two rolls of painter’s tape, a wooden dowel, a measuring tape, scissors, a pencil, and cardboard discs on a clean craft floor.
Clear hands-on instructional photograph showing two children holding rolled newspaper struts at an overlapping vertex node while a parent wraps cross-bracing tape around the joint to form an equilateral triangle.
More Upcycled Projects in Cardboard & Box Engineering & Beyond
How to Build a Mechanical Cardboard Automata
Learn mechanical engineering by building an oscillating kinetic sculpture from corrugated cardboard, barbecue skewers, and offset cams.
DIY Multi-Tier Cardboard Marble Run & Gravity Spiral
Engineer a multi-tier gravity run using toilet paper rolls, shipping boxes, and paper cup funnels to explore friction, slopes, and momentum.
How to Build an Upcycled Cardboard Pinball Machine
Construct a desktop arcade pinball game using a cereal or shoe box lid, rubber-band spring flippers, popsicle stick bumpers, and marble deflectors.